AWS is a cloud computing platform.
Amazon Elastic Compute Cloud (EC2) is a virtual server in Amazon Cloud for running applications on the Amazon Web Services (AWS) infrastructure.
It can serve practically unlimited set of virtual machines.
Let's start,
=>Create Account here
It will ask details like (Email, password, Bank card detail, etc.)
(Free new AWS account for 12 months)
Now once you are done with creating account, you will face an interface/console like this:
Move to:
*All Services-->EC2-->Instances
*Launch/Create Instance
*Select free tier AMI ( Let say, Ubuntu Server 20.04)
*Choose an instance type (Free tier of-course) and launch it.
( There are some more steps in between like 'configure instance','add storage' , but they better be remain default, unless you want to pay for this service.)
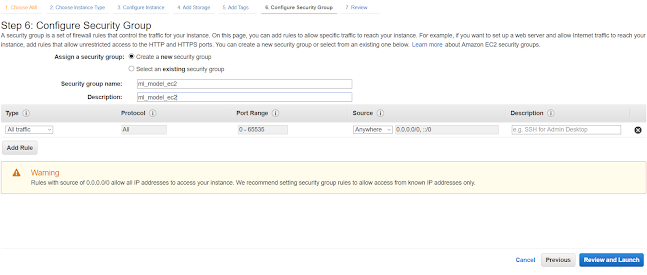
*Create security group (for access of some or all traffic, etc.) and launch it.
( You can set security group according to your preference)
*Final Review of instance and launch it.
*It will ask for Key Pair, make it and download ('.pem' file) it.
=>Software needed: (Search for latest version and Download them)
*PuTTY- For setting remote Ubuntu
*PuTTYgen- Creating private keys
*WinSCP- Drag and drop files/folders from remote to cloud
Now,
=>Open PuTTYgen
*Load it then add '.pem file' and generate '.ppk file'
*Generate and save private key from PuTTYgen (.ppk file)
(Using .pem file, which we have downloaded earlier)
*PuTTYgen's work is done.
Now you will need your public IPv4 DNS of your instance: (Go to Actions-->View Details)
=>Open winSCP
*Host name = Public IPv4 DNS
*User name = ubuntu
(Give password if u need, not necessary)
*Go to advanced option
-->SSH-->Authentication-->Add '.ppk file' (Which we have generated using PuTTYgen)
Now, Login.
We successfully connected Ubuntu to our local system.
You can add whatever files/folders you need on Ubuntu by drag and drop.
Now,
=>Open PuTTY (Not PuTTYgen)
*Host name = public IPv4 DNS
--> SSH-->AUTH-->Add '.ppk file' (Which we have generated using PuTTYgen)
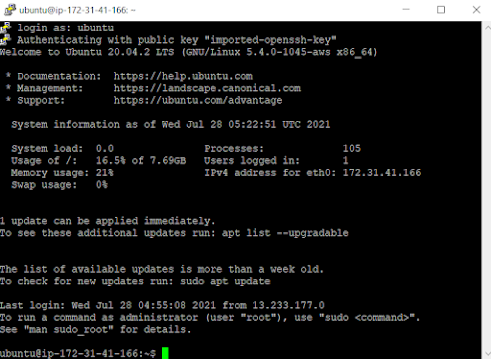
-->Command prompt will open-->login as: Ubuntu
(More Linux command like pwd, ls, etc. can be used.)
(We are connected to our cloud machine)
Download whatever packages needed for your project to run on this Ubuntu server.
(you can use it for some other purpose, like using Jupyter Notebook on this server, etc.)
(If you change anything on your instance over cloud, you need to login again on your local system through PuTTY)
Now access your server publicly as: Public IPv4 DNS: 8080
Eg:- ec2-15-206-75-179.ap-south-1.compute.amazonaws.com:8080
The Last and important point:
Don't forget to terminate the instance
(unless you want to pay for it 😅).
Well, In reality Cloud is ain’t about the clouds.🙌


No comments:
Post a Comment
If you want to convey your thoughts regarding this blog-post, you are most welcome...